The scald guard that comes with your Delta shower system helps prevent you from getting burned by water, but it can also keep your water from being warm enough.
Delta’s scald guard was designed for convenience, allowing you to adjust the water temperature without accessing your water heater or turning off your water supply. Each Delta faucet model comes with its own way of adjusting the scald guard. It’s vital you determine which model you have and follow the instructions for that specific model.
It can be easy to mix up the scald guard instructions for one Delta series with another. So it’s important to know the differences between each.
You don’t have to put up with a lukewarm shower experience. Learn how to adjust your Delta scald guard and get the hot shower you deserve.
How to Identify a Delta Shower Faucet Model
There are a few ways to identify your Delta faucets series or model number.
First, if you kept the instruction or user’s manual that came with your faucet, the model number should be right on the cover or on the first few pages.
Delta’s website also has a product identifier tool in which you can enter a description of the faucet to possibly get a model number.
Unfortunately, the product identifier tool will only work for newer delta products that have been released in the last five years.
Lastly, you can check the faucet’s model number by taking it apart. Whether you have a scald guard or scald-proof faucet, the type of handle and the showerhead can all help you narrow down the possibilities and figure out which model you have.
In addition, some models have numbers imprinted on them which can point you in the right direction.
How to Remove and Adjust a Scald Guard on a Delta Shower Faucet
Tools You Will Need
- Screwdriver
- Hex Keys or Allen Wrenches
- Pliers
Step-by-Step Guide
13 or 14 Delta Faucet Series
- Remove the Handle
Locate the screws on the side or back of your series 13 or 14 Delta shower handle. Remove these screws with the proper size hex key or Allen wrench. Once the screws are removed, you should be able to pull out the handle by hand.
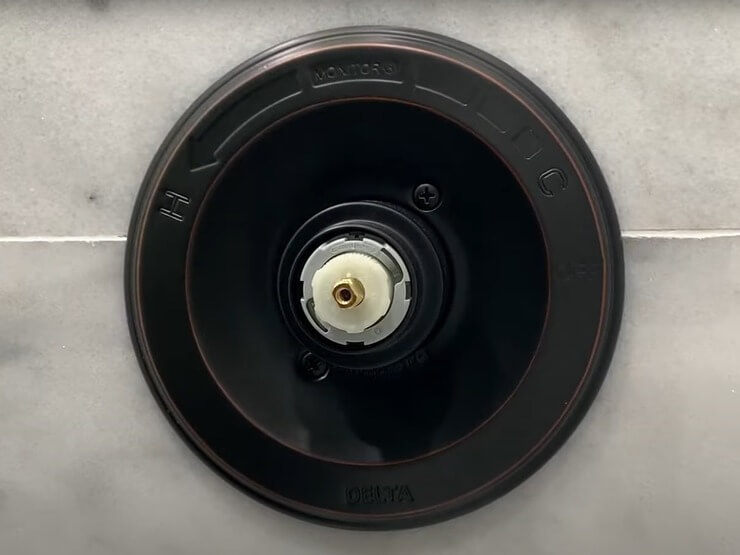
- Remove the Shower Cartridge
With the handle removed, you should see the shower cartridge which is surrounded by a sleeve. A plastic disc will block your access to the cartridge, which you can pry off with a flathead screwdriver.
You can pull this sleeve out by hand to remove the shower cartridge. If you are having any trouble, you can use the pliers. Just be careful not to damage your cartridge.
- Remove the Scald Guard and Adjust It
The scald guard is located inside the shower cartridge. You can pull the scald guard out by hand and then turn it counterclockwise to increase the temperature or turn it clockwise to reduce it.
- Putting Everything Back Together
Place the scald guard back inside of the cartridge. Make sure that the notches on the scald guard and the cartridge line up properly. After that, you can place the cartridge back into its sleeve and put the plastic disc back on.
Finally, reattach the faucet handle with its screws and test your water temperature.
17 Delta Faucet Series
- Remove the Temperature Knob
The Delta 17 Series uses a temperature control knob with an outer cover. You can remove this cover by hand or gently with a rag and screwdriver.
With the cover removed, you will find a screw beneath it. You will remove this screw then you should be able to take off the control knob by moving it back and forth.
- Remove and Adjust the Scald Guard
With the control knob removed, you will see a piece of black plastic called the scald guard.
You can remove the scald guard by hand or gently with a pair of pliers. With the scald guard removed, you can adjust it by turning it and paying close attention to the notches on it.
If the notches are turning clockwise, you are decreasing the temperature, and you’ll be increasing the water temperature by turning it counterclockwise.
- Replace the Scald Guard and Temperature Knob
Place the scald guard back into the handle assembly. Reattach the temperature knob with its screw and put the cover back on.
Run your water and make sure the water temperature is as desired.
17T Delta Faucet Series
- Remove the Faucet Knob Cover
Delta’s 17T series has a decorative knob cover that you need to remove before you can adjust the temperature of the water. You can grab this cover with your hands to remove it or gently pry it off with a screwdriver.
- Remove the Faucet Knob
With the cover removed, you should be able to locate a few hex key screws that can be removed. With those screws removed, you should be able to pull the faucet knob off by hand.
- Adjust the Temperature Knob
Beneath the faucet knob will be a temperature knob that you can adjust to change the water temperature. Like most anti-scald devices turning it clockwise will give you colder water, while turning it counterclockwise will make your water warmer.
- Put Everything Back Together
Screw the faucet knob back in and replace the faucet knob cover. With everything reinstalled, test your water temperature to make sure it’s where you want it.