Bathroom exhaust fans play a crucial yet underrated role in your bathroom. And when these fans stop working as they should, you will definitely take notice.
At first, you will have to deal with lingering foul odors, but the moisture your fan takes care of will evolve into mildew, mold, and water damage over time.
Whether the fan you have is ineffective or not powerful enough for the size of your bathroom, you can resolve this issue.
This article covers all the possible causes as to why your bathroom exhaust fan is not pulling air. We will also give you a way to test your fan and finally offer up some solutions to fix this problem.
Let’s begin.
Why Is My Bathroom Exhaust Fan Not Pulling Air?
Duct Issues
A common cause of a bathroom fan not pulling air is in the ductwork. There are many reasons why your ductwork could cause this problem.
For example, your ductwork could be taking a path to the outside vent that’s way too long or filled with unnecessary turns, which will affect your airflow.
Or you may not have any duct at all, and your fan is just blowing into your insulation.
Alternatively, you may have ductwork, but it does not lead outside.
Blockage
Blockages often happen and can severely limit the air pulled in by a bathroom exhaust fan.
Dust, mold, and other unwanted debris can build up behind your fan blades, limiting airflow. This usually occurs due to a lack of cleaning.
In addition, some blockages can happen elsewhere in the system. For example, a large object inside your ductwork will block airflow.
Also, your airflow will suffer if the vent outside is obstructed or blocked by leaves or other material.
Small Vent Pipe
Usually, the vent pipe that was installed with your original bathroom fan was meant to accommodate it, and they worked great together.
But one day, you decide to upgrade your bathroom fan to something more powerful.
Unfortunately, by upgrading your fan but not your vent pipe, your now small vent pipe can no longer handle this powerful fan causing your airflow to falter.
Electrical Issues
This is the least likely cause, but it is possible that your electrical system is to blame.
For example, if you live somewhere with an unstable electrical grid, your fan may not be getting the power it needs.
Or, more likely, you have loose or faulty wiring limiting your fan from working at full capacity.
Most electrical issues get worse over time and will result in your bathroom fan not working at all.
How to Test Your Bathroom Exhaust Fan
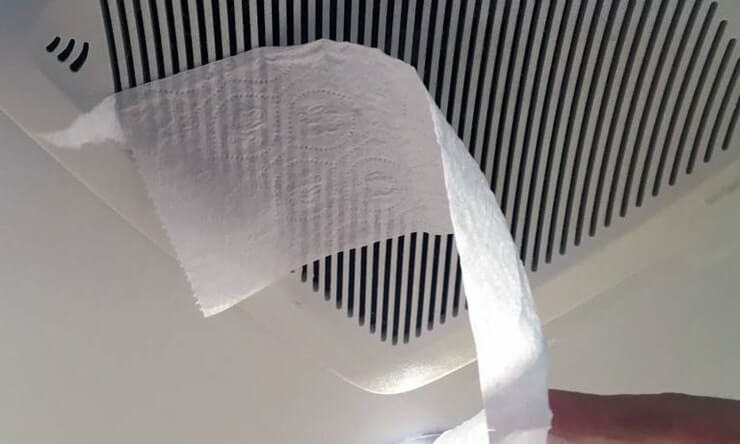
The Toilet Paper Test
The toilet paper test is a great way to determine if your bathroom fan’s suction is up to par. For this test, you only need one square of toilet paper.
Turn your bathroom fan on and hold the toilet paper square up to the fan’s cover. Let the toilet paper go, and if your fan has proper airflow, the toilet paper should stick to the fan’s cover due to its suction power. Then turn your fan off, and the toilet paper will float to the ground.
If the toilet paper does not stick to the fan’s cover while it’s running, your fan has issues with its airflow.
How to Fix Bathroom Fan Poor Airflow
Tools You Will Need
- Protective Eyewear
- Dust Mask
- Screwdriver
- Small Brush
- Step Ladder
- Voltage Tester (MultiMeter)
- Utility Knife
- Caulking Gun with Silicone Sealant
- Drill Gun
- Standard Roofing Ladder
Solutions
Resolving Issues With Your Ductwork
Step 1.
Resolving issues with your ductwork can be dirty work, so you should wear some clothing you don’t care for and equip protective eyewear and a dust mask.
Step 2.
Enter your attic and find the beginning of your ductwork above your bathroom.
Step 3.
Inspect the ductworks path to check if it takes a long, inefficient path, has too many bends, or does not lead to an outside vent.
Step 4.
You can shorten your ductworks path and straighten out bends by hand.
Step 5.
If your ductwork does not lead to an outside vent, locate your vent and attach the ductwork with a coupling. This can usually be accomplished with a screwdriver.
Step 6.
If your ductwork is too bent or otherwise damaged, you should remove it and replace it with new ductwork.
Unclogging Blockages
Step 1.
The first place to check for blockages is behind your fan blades.
Step 2.
Remove the fan cover with a screwdriver and equip your protective eyewear and a dust mask. Use a step ladder if you have trouble unscrewing the cover.
Step 3.
With the cover removed, use a small brush to clean out any debris that is blocking airflow to your fan.
Step 4.
If that does not work, locate your outer vent which is usually located on the roof or around ground level outside on an exterior wall.
Step 5.
Check and see if your vent is clogged with anything (usually fallen leaves), then simply remove the material by hand or unscrew the vent cover and remove the material that way.
Step 6.
The last blockage to check for is in your ductwork. Next, equip your dust mask and eyewear and enter your attic.
Step 7.
By lifting or running your ductwork through your hands, you can detect if an object is inside your ductwork blocking airflow.
Step 8.
You can unscrew a coupling and one end of your ductwork and remove the object.
Installing a Larger Vent Pipe
Step 1.
To install a larger vent pipe, you will first have to remove the old one. This work may involve using a ladder to access your roof, so take care, be cautious, and do not fall off your roof.
Step 2.
Locate your vent pipe, which is likely on your roof or at ground level, and remove it by first unscrewing the metal cap or cover. Next, use a utility knife to remove any tape or sealant used to hold the pipe in place.
Step 3.
Head into the attic or possibly basement and repeat the process on the vent pipe on the inside of your home and your old vent pipe will be removed.
Step 4.
From inside your home, insert your new pipe through the old opening. There will be markings on the pipe to let you know how far it should extend outside.
Step 5.
Use silicone to attach your pipe to the opening permanently. Repeat this process on the other side.
Step 6.
Attach the new ventilation pipe to your ductwork.
Step 7.
Depending on your vent system, you may have a cap or cover to install on the outside.
Step 8.
In any case, follow the manufacturer’s instructions with your new ventilation pipe to finish the process, then test out your fan to see if this new vent pipe improved your airflow.
Checking for Electrical Issues
Step 1.
If you suspect electricity to be the cause of your poor airflow, you can begin by checking your wiring.
Step 2.
Remove your fan’s cover as outlined in the unclogging blockages section.
Step 3.
Inspect your wiring and look for frayed, loose, or otherwise damaged wiring.
Step 4.
To take things a step further, you can use a MultiMeter or other voltage tester to check the voltage coming through the wiring.
Step 5.
You can consult the specifications of your fan to see how much voltage should be flowing into the fan.
Step 6.
If the voltage tester shows a reading less than what’s given in the fan’s specifications, you may have an electrical issue.
Step 7.
If you have low voltage or damaged wiring, you should consult a professional electrician to help resolve the issue.